You already understand how bulky contemporary tailgates are if you have a 4×4. It can be quite annoying when you have to keep touching a heavy tailgate every now and then, whether to pack camping gear, tools, recovery equipment or groceries. And that is precisely why tailgate assist kits have become so popular among 4×4 owners as an upgrade. A tailgate assist system will make opening and closing the tailgate smoother, safer and easier to control. The best part? The vast majority of kits are very simple to assemble at home using basic tools. For a more technical account of the installation procedure, you may also read this informative guide on installing a tailgate assist kit on your 4×4. What Is a Tailgate Assist Kit? A tailgate assist kit is an aftermarket device that employs gas struts and brackets to minimize the weight and force of your tailgate when opening and closing. Instead of: The tailgate dropped heavily Sudden slamming movement Struggling to lift the tailgate …the assist kit creates a slow, controlled motion that feels much smoother and safer. Most modern kits are designed specifically for popular 4×4 vehicles like: Ford Ranger Toyota Hilux Isuzu D-Max Nissan Navara Mitsubishi Triton Why Installing a Tailgate Assist Kit Is Worth It? It is also necessary to understand why many 4×4 owners believe this upgrade is worth the money before leaping into an installation. 1. Prevents Tailgate Slamming Controlled lowering is one of the greatest advantages. Heavy tailgates tend to fall violently without support, and this can be: Destruction – which is a matter of time. Mounting points and stress cables. Cause hand and finger safety hazards. A tailgate assist slows the movement and prevents abrupt drops. 2. Makes Daily Use Easier Tailgate helps in reducing the pressure of lifting and putting down the tailgate to operate it. This can be particularly helpful at a time when: One-handed holding of equipment. Loading tools frequently Working or camping in the vehicle. Most systems even allow easy one-handed operation. 3. Reduces Wear and Tear The constrained flow reduces the force over: Hinges Tailgate cables Latches Mounting brackets This will help increase lifespan and reduce the likelihood of costly repairs in the future. 4. Improves Safety Tailgating with heavy cars is risky, especially when on rough roads or off-road. A tailgate aiding device reduces the risk of injury by limiting the descent rate. Step-by-Step Installation Guide A certain installation process will differ for several models of cars, but the overall scheme will be similar. Step 1: Park Safely and Open the Tailgate Preferably, park your 4×4 in a flat area prior to this. Then: Open the tailgate half. Make sure that the car is steady. Hardware: keep it around you. This will give you safe access to the tailgate both sides. Step 2: Remove the Factory Tailgate Strap or Bolt The process of most installations starts with the support strap or factory mounting bolt removed. You will generally have to: Undo the factory screw. Carefully remove the strap. Keep the original hardware aside Some vehicles have Torx bolts, which can be harder to loosen. Step 3: Install the Mounting Bracket The kit will also have a bracket that links the strut to the tailgate or body. During this step: Make sure the bracket is in place. Provided washers and bolts. Tighten everything securely Positioning is very crucial, as when the strut is used improperly, it can strike adjacent panels or lights. Step 4: Attach the Gas Strut The actual installation succeeds this. The gas strut is likely to be entangled in: The body-side bracket The tailgate-side bracket As the strut is being attached, the tailgate starts being driven. The majority of kits are clip-on, designed to be easily installed. Step 5: Check Tailgate Movement Before making it all tight: Slowly open and close the tailgate. Assess smooth movement. Ensure around parts clearance. Tailgate now must descend slowly, upwards not so hard. Step 6: Tighten and Recheck All Hardware Once all is fine: Tie up any loose bolts. Recheck bracket stability Inspect cable alignment A fixed kit has to be solid with no unnecessary movement or noise. How Long Does a Tailgate Assist Last? A good tailgate assist kit can be used for several years, when it is correctly used. Lifespan depends on: Build quality Weather exposure Frequency of use Off-road conditions A majority of the high-end kits are produced using corrosion-resistant materials which are applicable in harsh environments. If you want to learn more about how these systems improve usability, check out our detailed guide. FAQs 1. What is a tailgate on a ute? A tailgate refers to a back door of a pickup truck or ute that opens up the cargo bay. 2. Are tailgate assists easy to install? Yes, the majority of tailgate assist kits are easy to install as a DIY project and typically only require simple tools and take less than 30 minutes to put in place. 3. Can you install a power tailgate? Yes, power tailgates systems can be installed as an aftermarket upgrade but are more sophisticated and more expensive than the standard assist kits. 4. How to install the tailgate lift support? Installation of the tailgate lift supports requires the user to remove the factory bolts and mounting brackets, then attach the gas strut according to the kit instructions. One of the most convenient, yet not too complicated, upgrades you can make to a 4×4 is installing a tailgate assist kit. It enhances security, reduces tension, secures your tailgate components, and makes daily use much easier, especially when you need to pack gear, tools, or camping gear. The installation process is also not as complicated as most people imagine. Most 4×4 owners can do the job at home without professional assistance with simple tools, time, and correct alignment. A tailgate refers to a back door of a pickup truck or ute that opens up the cargo bay. Yes, the majority of tailgate assist kits are easy to
Windshield Phone Mounts: 6 Things You Should Know First
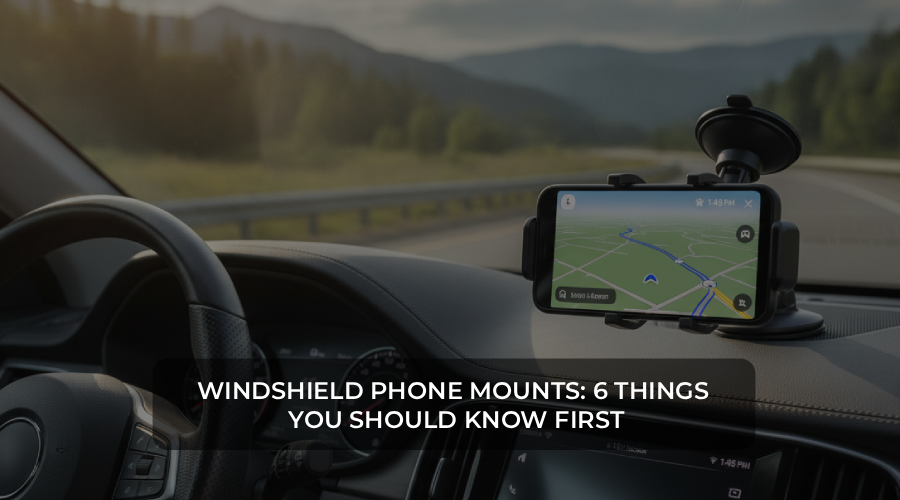
Windshield phone mounts are among the most popular among drivers who want higher visibility in their cars and easy access to their phones. Whether you use your phone to guide you, play music, or make hands-free calls, keeping it at eye level can significantly improve comfort and convenience. However, as much as windshield mounts possess enough positive sides to them, they also have some negative sides that most motorists cannot figure out the nature of these things. The wrong positioning, inefficient suction or a disregard for legal rules may transform an effective accessory into a distractor. That is the reason why it is important to know how these mounts really work and how to use them properly. To learn more about how they work and how to use them in the real world, check out this guide on windshield phone mounts. 1. Visibility Is Better – But Placement Matters Enhanced visibility is one of the greatest benefits of windshield mounts. Because the phone is brought nearer to your natural line of sight, you will not be required to look down so much. This helps with: Safer navigation viewing Reduced eye movement Better focus on the road Nevertheless, this advantage is only effective if the mount is properly positioned. It may be risky because, when placed in the wrong position, it can block your view of the road, pedestrians or traffic lights. Best practice: Place it toward the lower side of the windshield, or slightly off to the sides, so you can see it without it obstructing your view of the road. 2. They are Easy to Install and Adjust The popularity of windshield mounts can be attributed to their ease of use. They all have suction cups that enable you to: Install within seconds Adjust angles easily Remove without leaving marks Use across multiple vehicles This is why they suit people who change cars fairly often and those who prefer to adjust the phone’s position regularly. Ease of use must, however, not be at the expense of stability. Before driving, it is always important to ensure the suction is securely attached. 3. Legal Rules Can Vary Legal considerations are among the factors many drivers disregard. Most locations permit windshield mounts to be installed, as long as they do not obstruct the driver’s line of sight. There are even strict rules in certain areas on where you can lay them. Because of this: Incorrect placement can lead to fines It may also increase safety risks As it always works out better, you can always consult your local traffic laws before installing a windshield mount. Generally, it is believed to be safer and more compliant to keep the mount out of your immediate field of view. 4. Heat and Sunlight Can Affect Performance As the windshield mounts are under direct sunlight, heat is a significant factor. During hot weather: Suction cups may lose grip Adhesion may weaken The mount may fall off unexpectedly Also, your phone can warm up faster when it is directly in the sunlight, particularly when taking long drives. To avoid this: Park in shaded areas when possible Clean and reattach the suction cup regularly Avoid placing the mount in direct sunlight for long durations One of the most widespread causes of falling windshield mounts with time is heat. 5. Vibration Can Be an Issue Windshield mounts, particularly those with long, adjustable arms, are more susceptible to vibration. This happens because: Long arms enhance motion. The bumps on the road are moved to the mount. Weakly stable joints diminish stability. It can also be very hard to read the navigation in such a vibration, and the mount may not last as long as it would otherwise due to excessive vibration. To reduce vibration: Choose mounts with shorter arms Strong suction bases. Avoid loose joints If it is an issue that occurs too often, you can also check “How do I prevent a phone holder from vibrating too much while driving?” to get detailed solutions and fixes. 6. Best Positioning Makes a Big Difference The success of a windshield mount largely depends on its location. The optimal location will: Place your phone in a way that can be easily seen. Do not cover your road with your eyes. Be able to reach comfortably without straining. The most suggested idea is to keep it in the upper right-hand corner or adjacent to the rearview mirror, to ensure that it is always within your sight without causing any form of interference when driving. Adequate positioning can significantly boost the usability and safety in use. Windshield phone mounts are an excellent fit in terms of convenience, visibility, and flexibility, making them one of the most popular among drivers. Yet their effectiveness depends greatly on how effectively they are installed and maintained. Placement, heat exposure, suction quality, and vibration control are all important factors that determine the mount’s effectiveness over time. When properly installed, a windshield mount can help ensure that your driving experience is safer and more comfortable, and safer. However, when improperly installed, it may soon be more of a distraction than a useful tool. FAQs 1. Are windshield phone mounts good? Yes, they are quite convenient and have good visibility. They should, however, be placed in the right manner so as not to obstruct your view and create interruptions as you drive. 2. Is it legal to put a phone holder on the windshield? It is based on the domestic legislation. It is acceptable in most places so long as it does not intrude on your vision, but elsewhere placement is extremely rigid. 3. Where to mount a phone on a windshield? The most suitable place is either close to the corner or next to the rearview mirror, where it is always in view without interfering with your driving vision. 4. Do windshields have electronics? Some contemporary windshields may have sensors, heating or antenna coils, but this will not usually interfere with standard phone mounts. Yes, they are quite convenient