
Dealing with stubborn water spots on your beloved vehicle can be an ongoing struggle. The unsightly marks left behind by water droplets can sabotage the beauty of your car’s finish and detract from its overall allure. That’s where the power of a proper water spot remover comes into play, offering a solution that transcends regular washing. In this guide, we’ll explore the three exceptional products that will help you achieve a pro-level clean in the world of water spots. Moreover, you will learn the techniques for removing water spots and the factors that will help you decide on buying a suitable water spot remover. Water spots occur due to the minerals and impurities present in water, such as calcium and magnesium. As water evaporates on your vehicle’s surface, these minerals remain behind, leaving telltale marks that are often tough to remove. These spots can form after rain, washing your car, or even from water droplets left behind by sprinklers. If ignored continuously, these deposits can etch into your car’s paint, glass, and even metal surfaces, resulting in unsightly blemishes that degrade the overall aesthetics of your vehicle. Despite regular washing, water spots can persist on your car’s surface due to their stubborn nature. Conventional car washes often fail to effectively remove the mineral deposits, leaving spots that mar the shine. This is where specialized water spot removers come into play, offering a targeted solution to tackle these persistent imperfections and restore your vehicle’s brilliance. Water spot removers are more than just specialized solutions – they’re the key to unlocking a range of benefits that contribute to your vehicle’s overall appearance, longevity, and value. Restoring the Beauty and Shine – Water spots can significantly diminish your vehicle’s aesthetics, but water spot removers have the power to reverse the damage. These removers effectively erase dullness and haze caused by water spots, allowing your paintwork to regain its vibrant shine. By addressing the source of the problem, you’re not just masking imperfections – you’re reviving your vehicle’s original allure. Protection against Long-Term Damage –The unchecked water spots have the potential to cause long-term damage to your car’s paint. It can weaken the protective layers, leaving your vehicle vulnerable to further deterioration. Regular use of water spot removers creates a protective barrier against future spots. Your prompt action can help you safeguard your vehicle’s finish and prolong its overall lifespan. Enhancing Resale Value – When it comes to selling your vehicle, the first impression matters. Investing in water spot removers is an investment in your vehicle’s value. Regular application prevents unsightly damage and ensures your car maintains its pristine appearance, helping you command a higher resale price when the time comes. Here is a list of three exceptional products that are trusted by car enthusiasts and professionals alike for their ability to restore your vehicle’s luster. As an Amazon Associate, we may earn a small commission if you purchase any product by clicking the link without any additional cost to you. Chemical Guys SPI10816 Heavy-Duty Water Spot Remover Chemical Guys is a recognized name in car care and when it comes to heavy-duty water spot removal, this SPI10816 solution is a frontrunner. Designed to tackle even the most stubborn deposits, this remover is a favorite among car enthusiasts who demand exceptional results. The specialty gel works like magic to neutralize alkaline stains and effortlessly eliminate hard water spots combating mineral deposits left by evaporated water. Its powerful formula penetrates the spots, breaking them down for easy removal from paintwork, glass, or polished metal surfaces The true power of this remover lies not only in its instant action but also in its ability to prep surfaces for subsequent treatments. With the help of Chemical Guys’ Water Spot Remover, you can prepare your vehicle’s surface for waxing, protecting it against potential harm while maintaining its radiant appearance. In addition, this product is accompanied by a speed wipe quick detailer which is a handy solution to perform quick detailing once you have completed water spot removal. For optimal results, apply the remover using a microfiber applicator pad and gently massage the product into the affected areas working in small sections. One important aspect of its usage is learning the process or following the manufacturer’s instructions to the core. The formula should be used without any water and proper adherence to instructions is necessary to make the cleaning process easier. Moreover, applying it in excess quantity could be risky, especially on paintwork and glass surfaces. Meguiar’s Water Spot Remover Meguiar’s has long been synonymous with automotive excellence. Their Water Spot Remover lives up to the brand’s reputation, offering a specialized formula designed to combat water spots and restore surfaces to their former glory. Meguiar’s Water Spot remover employs advanced chemistry to break down mineral deposits and contaminants without damaging your vehicle’s finish. Its gentle yet potent formulation ensures that even the toughest water spots are dissolved without harming the paint, glass, or metal surfaces. Using Meguiar’s Water Spot remover is straightforward. Apply the remover to a clean microfiber cloth and gently rub the affected areas. However, be careful of the quantity while applying. Since the formula is made of compounding material, any excess usage of this liquid can leave behind streaks or smears and even harm your car’s protective coating. To be on the safer side, always follow up with a clean, damp cloth to wipe away the residue after applying the water spot remover. Another cause of concern would be repeated effort. While this formula works great on mild and moderate water spots, cleaning tough water stains could be challenging and may require constant scrubbing to get the desired results. Adam’s Water Spot Remover Adam’s Water Spot Remover showcases the brand’s dedication to innovation and quality. Designed to eliminate water spots without harming your vehicle, this product is a testament to Adam’s commitment to excellence. This advanced formula employs the power of acid and specialty surfactant technology to quickly address unsightly alkaline water spot stains, effectively
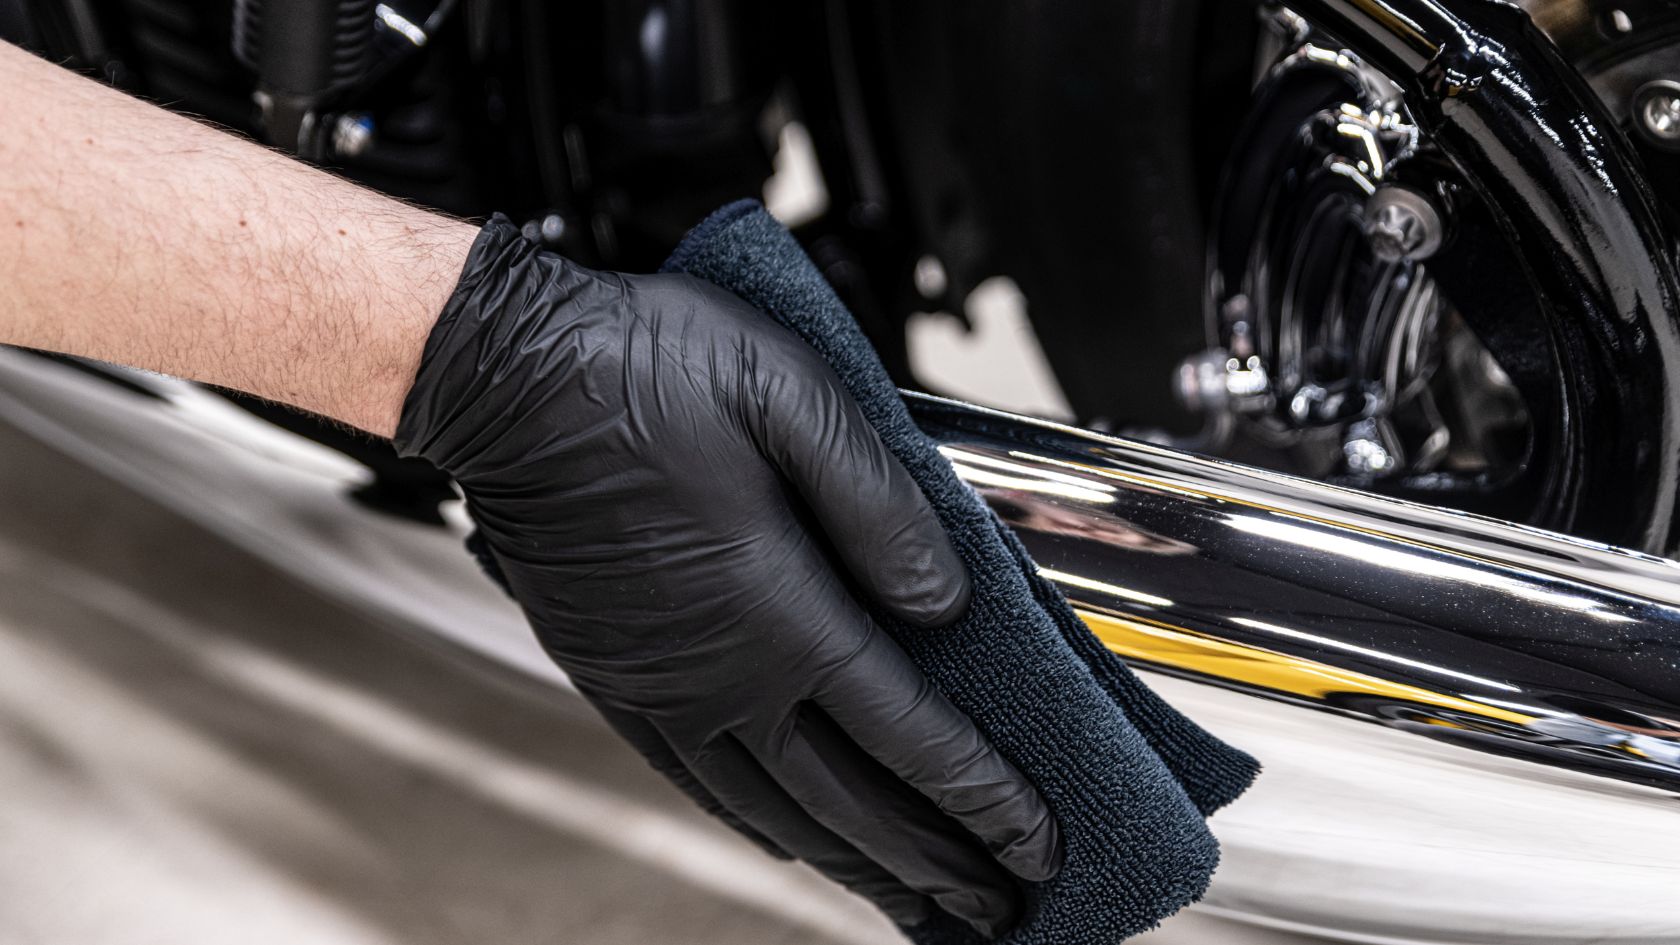
How to prevent water spots on motorcycle chrome
Picture this: you’re cruising down the open road on your motorcycle, the sun glinting off the polished chrome, turning heads wherever you go. But then, those pesky water spots threaten to steal the show. How do you prevent those sneaky water spots from taking center stage on your ride’s shining armor? Can chrome really leave water spots? How to prevent water spots on motorcycle chrome? In this guide, we’re delving deep into the realm of motorcycle chrome care. From the art of preventing water spots on your precious chrome trim, bumper, and pipes to whipping up your very own homemade chrome cleaner, we’ve got you covered. Let’s unravel the mysteries, equip you with expert tips, and ensure your chrome stays as dazzling as your two-wheeled adventures. Preventing water spots on your motorcycle’s chrome demands a multi-faceted approach. To start with, there are gentle liquid cleaners to remove dirt and debris without scratching the surface. Secondly, harsh abrasives liquids often damage the pristine appearance of your motorcycle chrome so it is better to avoid them and opt for chrome-specific cleaning methods. Related Read: How to remove water spots on motorcycles Moreover, shield chrome exhaust pipes from oil and fingerprints to prevent discoloration and when working on your motorcycle, cover chrome parts to safeguard against accidental damage. Furthermore, refrain from storing chrome near chemicals that can harm its finish. Remember, genuine chrome requires care and expert-backed techniques to keep water spots at bay, preserving your motorcycle’s lustrous allure. It’s important to learn more about the causes and techniques to keep the chrome glowing. The maintenance journey begins by dispelling myths surrounding water’s role in chrome care. Contrary to popular belief, water is not your chrome’s nemesis; it can be harnessed as a solvent and cleaner when used correctly. Moreover, water can act as a lubricant during cleaning, minimizing the risk of abrasion. It’s important to note that water itself isn’t the culprit for water-induced corrosion on chrome. Corrosion occurs only if your motorcycle isn’t thoroughly dried after cleaning. The detrimental effects of road grime and dirt can leave a daunting effect on chrome. In terms of cleaning, dry cloths might seem convenient, but they can damage both paintwork and chrome. To ensure proper drying, it is recommended to use bike dryers, follow the manufacturer’s instructions, and employ maintenance sprays designed to disperse water effectively. Furthermore, the need to minimize direct contact with chrome surfaces is important to prevent unnecessary abrasions. Not all that glitters is chrome! Modern vehicles often incorporate plastic elements designed to mimic the appearance of chrome. It’s crucial to distinguish between genuine chrome and plastic imitations to ensure the right cleaning approach. Many vehicles feature plastic “chrome” accents that can be mistaken for the real thing. To avoid accidentally damaging plastic components, carefully assess and verify the material before applying cleaning methods. Understanding the difference between true chrome and plastic imitations will help you tailor your maintenance routine and achieve the best results. Chrome components add a touch of elegance to your motorcycle, but they also require diligent care to stay stunning. Here’s how to maintain their brilliance: Safely Eliminating Dirt and Debris Before diving into cleaning, ensure you remove loose dirt and debris using a gentle liquid cleaner. This step prevents scratching during the cleaning process. Sidestepping Harsh Abrasives Harsh abrasives can damage chrome surfaces. Stick to soft microfiber cloths and chrome-safe cleaning solutions to maintain the pristine shine without causing harm. Preserving the Gleam of Chrome Pipes Exhaust pipes are prone to residue from oil, grease, and fingerprints that can discolor when exposed to heat. Regularly clean and protect these areas to prevent discoloration during operation. Combating Boot Marks and Tar Buildup Road tar and boot marks can mar the appearance of chrome. Use specialized removers to gently eliminate these stubborn marks without damaging the surface. Protection during Maintenance While working on your motorcycle, cover chrome parts to shield them from potential damage due to dropped tools or accidental scratches. Shielding Chrome from Damaging Substances Never store chrome parts near chemicals like swimming pool solutions, fertilizers, or concrete powder, as they can corrode and tarnish the chrome finish over time. Different chrome surfaces on your motorcycle require specific care to prevent and remove water spots effectively. Let’s delve into the techniques for preserving the brilliance of various chrome components: Chrome Trim Elegance: Water Spot Prevention and Removal Chrome trim adds a touch of sophistication to your motorcycle, but its intricate design can make water spot removal challenging. To prevent water spots, consider applying a wax or sealant specially formulated for chrome surfaces. This protective layer will make water beads up and roll off, reducing the chances of water spots forming. For water spot removal: Bumper Brilliance: Sustaining the Shine of Chrome Bumpers Chrome bumpers are susceptible to water spots, especially after rain or washing. Regular maintenance is the key to keeping them pristine. Follow these steps: Pristine Chrome Pipes: Spotless and Streak-Free Finish Chrome pipes deserve special attention, given their exposure to heat, dirt, and moisture. To maintain their spotless finish: Since chrome pipes are susceptible to water spots and accumulated gunk due to their exposure to various elements you can explore some additional effective methods to keep them spotless and gleaming by reading this post. Ensuring the longevity of your motorcycle’s chrome finish doesn’t stop at water spot prevention and removal. Proper post-cleaning care and enhancements play a crucial role in elevating the shine and overall allure of your chrome components. Cooling down and washing off After removing water spots or cleaning your motorcycle’s chrome surfaces, it’s essential to allow the components to cool down before applying any additional products. Hot chrome can be more susceptible to damage from chemicals and cleaning agents. Once the surfaces are cool, follow these steps: Regular cleaning enhances chrome’s luster Regular cleaning not only prevents water spots but also enhances the natural shine of chrome. The act of cleaning itself removes dirt, grime, and contaminants that can dull the
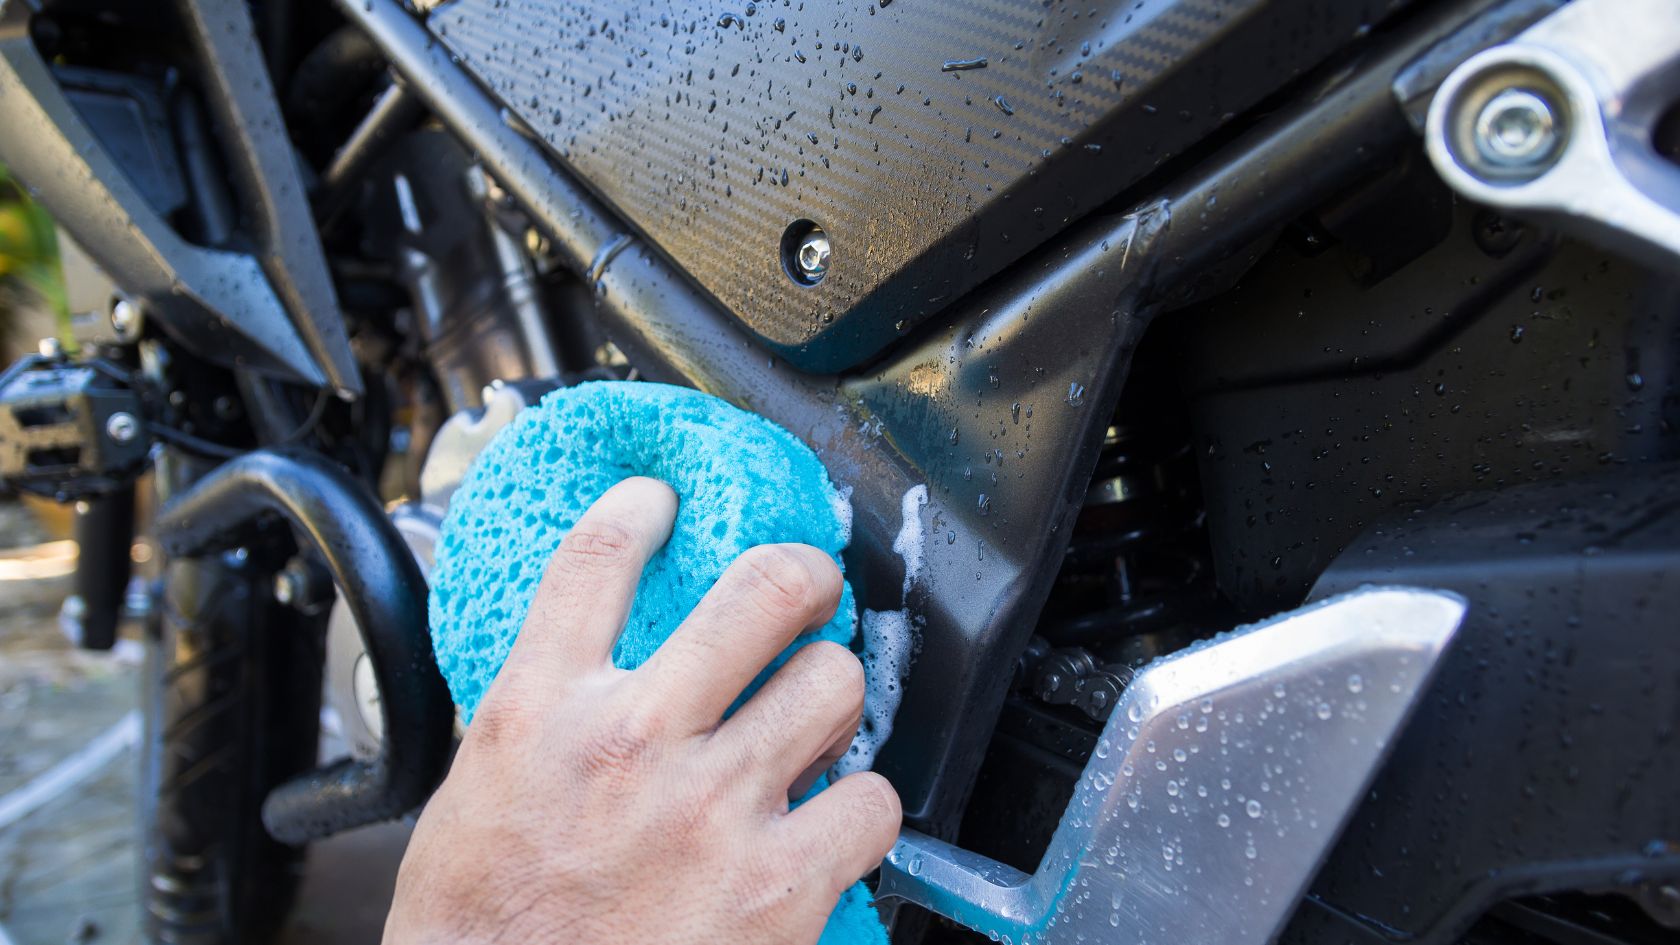
How to remove water spots from motorcycle: Tips and Tricks
Are you constantly bothered about the water spots on your motorcycle? These pesky, unsightly marks can appear out of nowhere on your prized motorcycle. Whether you’ve encountered them after a refreshing rain shower or from using tap water for washing, these spots can quickly turn your two-wheeled beauty into a spotted canvas. In this guide, we’re diving into the world of water spots, understanding why they form, and uncovering the secrets to prevent and eliminate them. Discover how to maintain the gleaming allure of your motorcycle’s finish and protect it from the subtle dangers that water spots pose. To remove water spots from motorcycles, there are some readymade and do-it-yourself processes. One of the simple yet effective processes is using a mild vinegar solution. Another way to remove water spots is specialized removers which can be gently rubbed on the affected areas to get desired results. Generally, water spots appear from minerals in water that can etch into the paint and ruin the finish. You can prevent them by using distilled water for rinsing, washing the motorcycle in shaded areas, and employing protective coatings after the wash. For more comprehensive guidance on tackling water spots, it is important to understand the causes, and adopt prevention methods, to keep your ride spot-free and gleaming. Ever wondered why water spots seem to have a knack for appearing just when you thought your motorcycle was all set? Let’s dive into the science behind these pesky marks. The chemical reaction Water spots aren’t just random splatters; they’re a result of a chemical dance between the water and the minerals it carries. When water, especially when left standing, evaporates, it leaves behind the minerals and contaminants it picked up along the way. These minerals, like calcium, magnesium, and even pollutants, can form stubborn spots on surfaces. Rainwater Rain, the refreshment that fuels our rides, can also be a hidden foe. Rainwater isn’t the pristine substance we imagine. As raindrops fall through the atmosphere, they pick up dust, pollutants, and minerals, making them less innocent than they appear. When rainwater dries on your motorcycle’s surface, it leaves behind these hitchhikers as water spots. Tap water But don’t think tap water gets a free pass. Often rich in minerals, tap water can leave deposits when it evaporates. And if you’ve ever noticed water spots after washing your motorcycle, there’s a reason. Water left to air dry can create concentrated spots as the water evaporates, and the minerals are left behind. Lack of drying process Another stealthy culprit is the lack of a thorough drying process after washing. Imagine washing your motorcycle, feeling accomplished, but leaving it to dry naturally. As the water evaporates, it brings along those minerals, leaving their signature spots behind. Always remember: giving your ride a gentle drying with a microfiber cloth can prevent these marks from ever making an appearance. So, what happens if you ignore the water spots on your motorcycle’s surface? Water spots might seem like innocent blemishes, but their impact on your motorcycle’s appearance can be far from benign. Ignoring these spots is like letting rust set in on your pride and joy. These seemingly harmless marks can lead to a cascade of problems that chip away at your bike’s gleam and value. Motorcycle paint and coating at risk The primary danger lies in the minerals that create water spots. As the sun kisses your motorcycle, it bakes those minerals into the surface. Over time, these spots can etch into the paint and clear coat, leaving behind tiny craters that catch the light differently. The result? A patchwork of reflections that tarnishes the once-smooth surface. But that’s not all. Water spots can also act as magnifying glasses for the sun’s rays. The concentrated heat can actually bake those minerals further into the surface, making their removal even more challenging. What starts as a minor inconvenience can spiral into a major paint correction project. Signs of rust and corrosion And remember, the danger isn’t just skin-deep. Underneath the spots, contaminants and pollutants can slowly corrode the paint, eating away at the protective layers. It’s like giving rust a VIP pass to infiltrate your motorcycle’s body. Plus, if left untreated, water spots can compromise the performance of protective coatings and waxes you might have applied. Inviting costly repairs and replacements It’s a vicious cycle. Ignored water spots lead to diminished beauty and compromised protection, which in turn leads to more frequent detailing, repairs, and the dreaded paint correction. Prevention is the key, and a few smart steps can go a long way in shielding your ride from those pesky marks. The Distilled Delight: When it’s time for a rinse, consider using distilled water. Unlike tap water, distilled water is free from minerals that cause water spots. Think of it as a spa treatment for your motorcycle. A final rinse with distilled water can help minimize the risk of those spots forming during drying. Shade the Beauty: Wash your motorcycle in a shaded area whenever possible. When water evaporates under the scorching sun, it leaves behind minerals that can crystallize into water spots. By washing in a shaded spot, you give less chance for these spots to take shape. Embrace Waterless Washing: Consider waterless or no-rinse washing methods. These solutions offer a gentle way to clean your motorcycle without the need for a traditional water rinse. By avoiding excessive water exposure, you can significantly reduce the risk of water spots forming. The Dry Spell: After washing, don’t forget to dry your motorcycle thoroughly. A microfiber cloth is your best friend here. Imagine you’ve just given your motorcycle a wash. Instead of letting it air dry, take a microfiber cloth and gently pat the surface. Focus on areas where water tends to accumulate, like around mirrors and in crevices. This simple step prevents water spots from forming and gives your ride that extra gleam. Seal the Deal with Coatings: Apply protective coatings and waxes to your motorcycle’s surface. These shields create a barrier
Best Moisture Absorber for Cars (2025)
With all the convenience and comfort we get from our cars keeping them clean, fresh, and free from moisture can be challenging. Excess moisture can lead to unpleasant odors, mold growth, and even damage to the interior. To tackle this issue, moisture absorbers come to the rescue, ensuring a dry and pleasant driving experience. In this comprehensive guide, we’ll explore the best moisture absorbers for cars, highlighting their importance, benefits, types, and how they can contribute to a better driving environment. So, continue reading till the end! Moisture control is a critical aspect of car maintenance that often goes overlooked. Excess moisture can accumulate within your car’s interior, causing a range of issues that affect both the vehicle and its occupants. From foggy windows and musty odors to damaged upholstery and electronic malfunctions, the consequences of neglecting moisture control can be extensive. Related Read: Is hot or cold air better for condensation in car? Moisture absorbers, also known as car dehumidifiers, are ingenious devices designed to tackle the challenge of excessive moisture inside your vehicle. These compact yet powerful products work by absorbing and trapping moisture from the air, thereby maintaining an optimal humidity level within the car’s interior. By preventing the buildup of moisture, these absorbers effectively mitigate the risk of mold, rust, and other moisture-related problems. Moisture Absorbers offer numerous benefits for maintaining a dry and comfortable environment inside your car. Here are a few of them: Mold and Mildew Prevention – Excess moisture can lead to mold and mildew growth inside your car, causing health risks and damage to interior surfaces. Seat and carpets are some of the common victims of mold and mildew growth. Using a moisture absorber can significantly reduce the chances of mold forming on these surfaces. These absorbers help prevent moisture by maintaining a drier environment. Odor Control – Musty odors can develop when moisture interacts with dust and particles inside your car. These odors can be unpleasant and difficult to eliminate. For example, if you accidentally spill a drink in your car it can generate a lingering smell which can make driving uncomfortable. By reducing moisture levels, moisture absorbers help prevent such odors and dampness from forming. Corrosion Protection – High humidity levels can accelerate corrosion on metal components and electronics in your car. A frequently parked car near the coast can cause corrosion due to salt air. Moisture absorbers can help mitigate this risk and also reduces humidity, thus protecting metal surfaces and preventing rust formation. Clearer Windows and Enhanced Safety – Foggy windows due to high humidity can obstruct your view while driving, especially during colder weather. Moisture absorbers reduce condensation on windows, ensuring clearer visibility and safer driving conditions. For example, when driving early in the morning or late at night, moisture absorbers can help prevent the need to constantly wipe or defrost your windows. Interior Preservation – Upholstery, fabrics, and leather can degrade over time if exposed to prolonged moisture. If you accidentally leave your car’s windows down during a rainstorm, using moisture absorbers can help minimize damage to the interior materials. Such products help maintain the integrity of these materials by reducing moisture content in the air. With the plethora of products, it could be difficult to choose the right and best moisture absorbers for your car. To address your confusion here is a list of 3 best moisture absorbers for cars: As an Amazon Associate, we may earn a small commission if you purchase any product by clicking the link without any additional cost to you. BARSKA Moisture Absorber Dehumidifier The BARSKA Moisture Absorber offers a reliable solution for moisture control and protection of valuables. This dehumidifier serves as an essential accessory for small enclosed spaces, ensuring the preservation of sensitive items. Its multifunctional design makes it an ideal choice for a wide range of applications, including home closets, safes, cars, RVs, boats, and various storage containers. One of the standout features of this moisture absorber is its built-in humidity indicator. The indicator transitions from blue to pink, providing a clear visual cue when the absorber reaches its absorption capacity. This user-friendly feature eliminates guesswork, ensuring you know precisely when it’s time to renew or replace the absorber. However, the performance of this indicator might not be uniformly consistent. Occasionally, it could be difficult to determine when to recharge the absorber, as the outer package fails to change color in a timely manner lacking the anticipated color transition. Having said this, renewability is a key advantage of the BARSKA Moisture Absorber. When the absorber has collected a significant amount of moisture, it can be effectively renewed by microwaving it for up to 4 minutes at 600W. This innovative approach allows the absorber to evaporate the moisture it has accumulated, extending its lifespan and enhancing its cost-effectiveness. The BARSKA Moisture Absorber claims to absorb 45 grams of moisture with a 150g weight, particularly in humid environments. As against its claim, the compact dimension of this product is not too impressive. Despite its well-made design, there are concerns about its capacity to combat excess moisture effectively. Despite these drawbacks, the BARSKA Moisture Absorber presents a valuable solution for moisture control in confined spaces. Its effectiveness and quality construction are evident. Its ability to maintain a dry environment and protect valuable items remains noteworthy, and the potential for enhancements to the indicator could further elevate its utility. Eva-dry E-333 Mini Dehumidifier The Eva-dry E-333 Mini Dehumidifier provides an efficient solution for humidity and odor control in small spaces. The sleek and compact design adds to the product’s appeal. It’s portable and versatile, allowing you to hang or place it anywhere you need to combat humidity. A unique aspect of this dehumidifier is its dual condensation release, both front and back. This feature adds to its effectiveness in maintaining a dry environment and combating moisture-related issues. What’s remarkable about this mini dehumidifier is its longevity. The unit can last between 20 to 30 days before needing a recharge, thanks

The Ultimate Guide to Choosing The Best Anti-Fog Sprays for Cars (2025)
Foggy windows can be a major safety concern during morning mists or sudden temperature changes. Cleaning the foggy windows with normal cloth and cleaner could be a daunting task and it may not give you the desired results. Anti-fog sprays emerge as the unsung heroes of safe driving. Delving into the importance and benefits of anti-fog sprays, this guide unveils the secrets behind their effectiveness. From exploring the types of anti-fog sprays available to deciphering the factors to consider when choosing the right anti-fog spray, we’re here to unravel it all. If you’re ready to peer through misty mornings with unparalleled clarity, let’s embark on a journey to discover the 3 best anti-fog sprays that promise to transform your driving experience. Driving with foggy windows can be incredibly hazardous, particularly during cold weather or high humidity. Picture this: you’re on the road, eager to reach your destination, when suddenly, your car windows become shrouded in a thick layer of fog creating not only inconvenience; but a safety hazard. Related Read: How to reduce glare on your car windshield This is where the significance of anti-fog solutions comes into play. These ingenious formulations work like a shield against the perplexing dance of condensation, ensuring that your visibility remains uncompromised. But it’s not just about convenience; it’s about averting potential accidents. Anti-fog solutions are designed to prevent condensation from forming on your car windows, ensuring clear visibility and safer driving. By comprehending the importance of anti-fog solutions for cars, you’re not only safeguarding yourself and your passengers but also fostering a smoother, stress-free journey. Finding the right anti-fog spray could be a daunting task owing to hundreds of products. After extensive research and analysis, we’ve curated a list of our top 3 recommended anti-fog solutions for car windows: As an Amazon Associate, we may earn a small commission if you purchase any product by clicking the link without any additional cost to you. Rain-X Anti-Fog The RainX Interior Glass Anti-fog is a remarkable product that goes beyond the conventional, targeting the often-neglected interior glass surfaces. The blurry vision caused by fogged-up windows is impeccably cleaned by this spray. What sets this product apart is its proactive approach to fog prevention. With a simple application, it treats your car’s interior glass and mirrors with a special coating that attracts water. This means that moisture collecting on your windows disperses quickly, leaving the glass clear and fog-free. No more rolling down windows or wiping the glass in the middle of your drive. However, it’s important to note that if not applied correctly, the product might dry with streaks, affecting visibility when the sun hits it. Having said that, the real beauty of the RainX Interior Glass Anti-fog lies in its effectiveness across various weather conditions. Rain or shine, cold or humid, this spray ensures your vision remains unobstructed. Despite the occasional challenges, the RainX Interior Glass Anti-fog remains an effective solution for maintaining visibility. It’s true that the correct application requires attention to detail, and some users have faced difficulties in this regard, resulting in streak marks on the window. However, for those who carefully follow the instructions and manage to apply it without streaks, the results seem to be pleasing and effective in preventing fog buildup. Shine Armor Anti-fog The SHINE ARMOR Anti Fog Hero is a true marvel that brings powerful glass protection to your fingertips. Its prowess lies in its ability to combat fogging on all glass surfaces while taming uncontrolled water condensation on windows, ensuring you never have to compromise on visibility. This product harnesses the latest in glass coating technology, offering a scientifically engineered solution with anti-static and anti-dust properties. Not only does it deliver exceptional fog prevention, but it also ensures a clear view by repelling dust that often hinders visibility. Designed for durability and invisibility, the SHINE ARMOR Anti Fog Hero guarantees crystal-clear visibility for every vehicle, lasting up to 3 months even under extreme weather conditions. Rain or shine, this spray ensures that your view remains unobstructed and you get a safe driving experience. It works wonders on an array of surfaces, from windshields and mirrors to ski masks, eyeglasses, and even bathroom mirrors. Ease of use is another commendable feature of the SHINE ARMOR Anti Fog Hero. Applying it is as simple as a spray followed by a wipe using microfiber, towels, or wipes. However, the size of the cloth provided for buffing after application is on the smaller side, making it a bit challenging to effectively buff out multiple windows. You may need a larger cloth for more convenient usage. Meticulous preparation is another obligation to apply this product effectively. It is recommended to clean the glass thoroughly before application. This attention to detail ensures the product’s effectiveness in preventing fogging. Hendlex Nano Anti-fog Spray The Hendlex Nano Anti Fog Spray’s innovation lies in its Nano formula, a departure from traditional silicone-based approaches. Operating on a molecular level, this formula ensures a longer-lasting effect and heightened resistance to environmental factors. Nanoparticles deeply adhere to the surface, eliminating concerns about surface damage caused by silicone layers. Embracing the power of nanotechnology, this spray is odorless, long-lasting, breathable, invisible, and astonishingly superhydrophobic. What sets this product apart is its exclusive anti-fog capabilities that extend beyond the realm of automobiles. This versatile spray comes with a little bottle of cleaner and can be used on various surfaces, including mirrors and home windows. However, a fluent application could be a challenge due to the lack of a spray nozzle and clear instructions. Another drawback is reapplication which requires a thorough cleaning, as the existing layer is not easy to remove. Meticulous glass cleaning and a focused reapplication can generate better results. The protective coating of this spray is resilient and invisible still lines and streaks on the glass are visible if the product is left on for an extended period. The product may not last as long as claimed but does a decent job of remaining effective
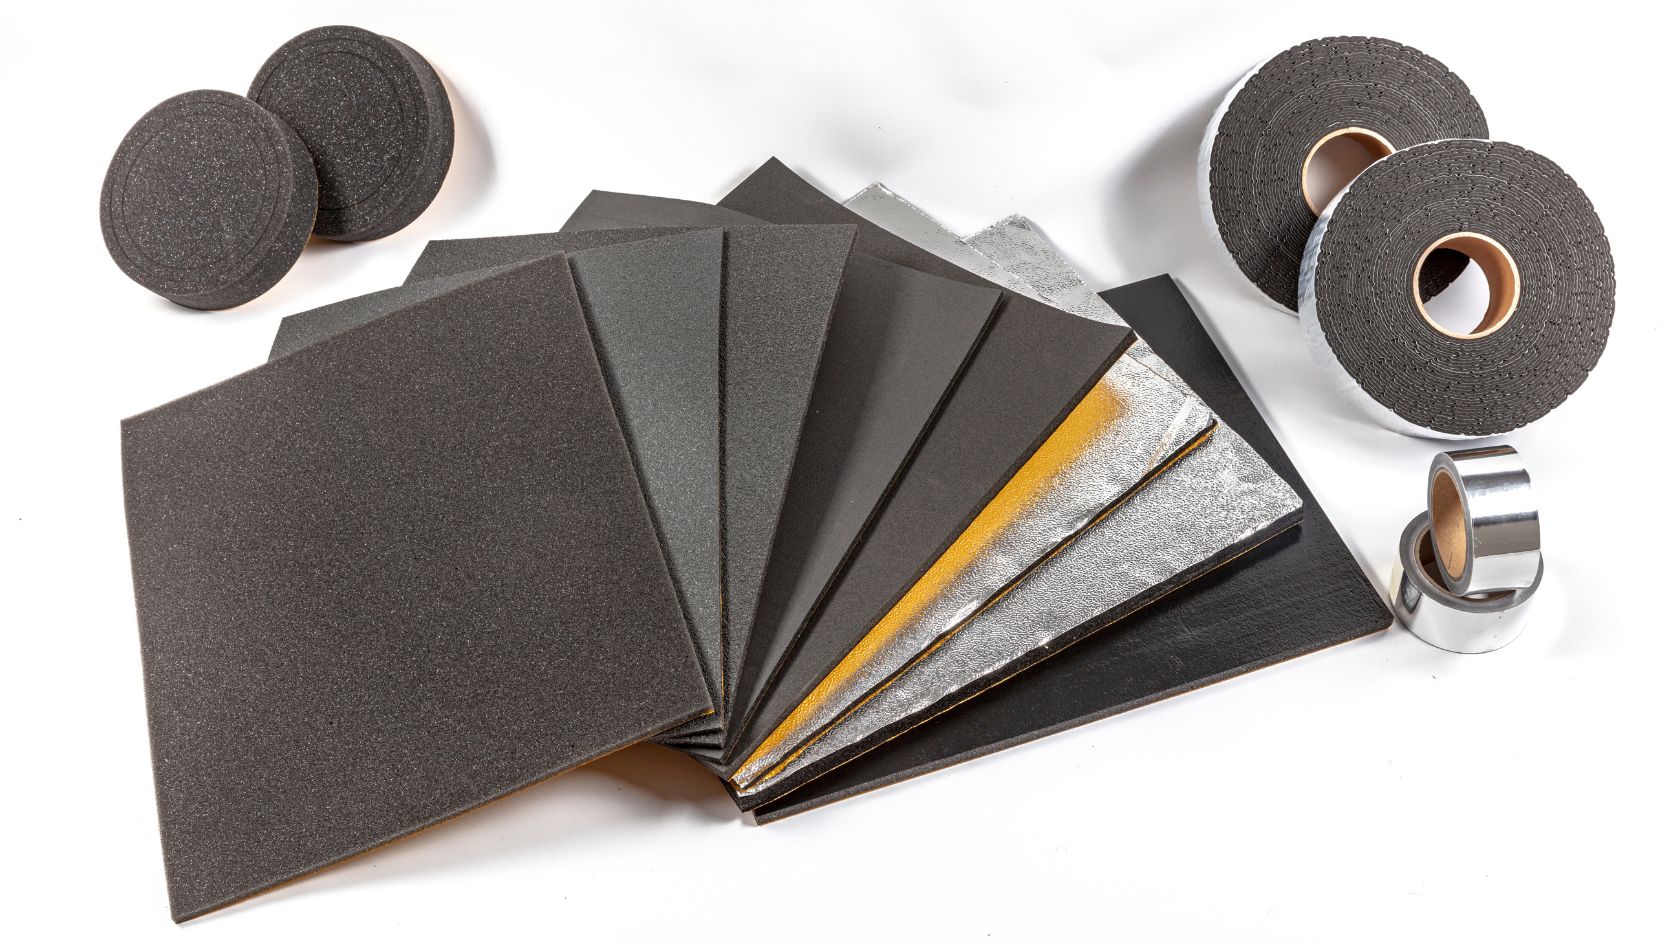
Sound Deadening Material for Cars: Different Types and Installation Process
Sound Deadening Materials in Cars are the need of an hour for those motorists who love listening to music and want to enjoy a peaceful driving experience. These mats help create a tranquil cabin environment by mitigating external noises for drivers and passengers alike. From the raw power of butyl to the insulating embrace of foam, each material of sound deadening contributes to creating an oasis of calmness within your car. In this comprehensive guide, we delve into the diverse landscape of sound-deadening materials, exploring their various types and shedding light on the intricate process of installation. Sound-deadening materials are primarily designed to reduce and absorb the noise generated by road vibrations, external elements, and even the vehicle’s own mechanical operations. Related Read: How to soundproof car windows These sound-deadening materials are crafted from various substances including rubber, foam, and vinyl. To effectively minimize unwanted sounds, it is important to understand the material required for specific vehicles and their installation process. Butyl Rubber Mats Among the most popular sound-deadening materials are butyl rubber mats. These mats are known for their exceptional noise-dampening properties because of their extraordinary thickness and high-quality foil. Both aspects matter when it comes to reducing the amplitude. Butyl rubber is free of fillers and possesses thick annealed foil. Its tough resistance capabilities don’t allow it to melt easily. If you are looking to cover the effects of structural noise coming from the engine, exhaust, or tires then butyl material is the best option. The mats made of butyl rubber are designed to adhere seamlessly to various surfaces within the car. They can be applied to the floors, doors, roof, and even the trunk area to create a comprehensive sound barrier. Closed-Cell Foam Insulation Closed-cell foam insulation is another viable option for sound deadening. This foam is adept at blocking out external noises while also providing thermal insulation. Closed-cell foam made of polyethylene is highly suitable for sound dampening along with water retention and shock absorption. Such foam insulation is already used in many industrial applications including construction, buildings, and packaging. It can be strategically placed within cavities, behind panels, and even under carpets to create an additional layer of soundproofing. As compared to butyl, closed-cell foam-based mats are highly efficient in curbing airborne sound waves. If used in isolation these mats are a great choice to have a luxurious feel and environment along with temperature and sound insulation. Mass Loaded Vinyl (MLV) For those seeking an extra layer of protection against sound intrusion, Mass Loaded Vinyl (MLV) is a valuable choice. This dense and flexible material can be applied to various surfaces, serving as an effective barrier against airborne noise. Talking of density, MLV made of heavy metal particles along with mass vinyl creates an effective sound-blocking mechanism. The limpness of MLV is another factor that prevents resonance and absorbs noise vibration softly. MLV mats are versatile and flexible making them suitable for areas where other materials might be challenging to install. It is perfect for those seeking a controlled car environment from airborne noises and sound waves appearing from the gaps. Whatever material you choose the effectiveness lies in their installation process. This is what we will cover in the next section. The installation process of sound-deadening mats requires attention to detail and a strategic approach. While the specifics may vary based on the material and your vehicle’s model, the general process involves the following steps: Before you begin the installation process, gather the following tools and materials: Cutting and Placement Measure the dimensions of the car floor, door, roof, and trunk, and cut the sound-deadening mats to fit precisely. Start with larger sections and trim as necessary to ensure a snug fit. Carefully adhere the mats to the designated surfaces, pressing firmly to eliminate air bubbles and ensure secure attachment. Car Floor Step-by-Step Installation Guide Step-by-Step Installation Guide Step-by-Step Installation Guide Step-by-Step Installation Guide Sealing Edges and Gaps To maximize the effectiveness of the sound-deadening mats, seal any edges, corners, or gaps using specialized sealants or adhesives. This step ensures a complete barrier against noise intrusion. Testing and Reassembly After installation, test the fit of various components, such as panels, carpets, and seats, to ensure that they align properly. Reassemble any removed parts and take note of the difference in noise levels as you embark on a test drive. With sound-deadening material strategically placed on car floors, doors, roofs, and trunks, you’re well on your way to creating a serene driving environment that complements the road ahead. Properly installed sound-deadening materials result in a quieter cabin, free from the intrusion of external noises. Vibrations from the road, engine, and other sources are significantly minimized, creating a more serene driving environment. Moreover, the enhanced insulation contributes to improved climate control and temperature stability inside the car. Incorporating sound-deadening materials in your car goes beyond mere luxury; it’s a tangible investment in elevating your driving experience. By exploring the diverse array of materials available and mastering the art of installation, you can transform your vehicle into a haven of tranquility on the road. Whether it’s the floor, door panels, trunks, or roof, each application adds to the overall effectiveness of noise reduction. Following the installation techniques from this post, you can create a quieter, more enjoyable ride. As you navigate the bustling streets and highways, the difference in noise levels will serve as a testament to your commitment to comfort and serenity.