
There are many factors to consider while choosing a good-quality jumper cable and one of them is amperage. If you are wondering how many amps can jumper cables handle then continue reading this post to find the answer. A set of jumper cables is an essential supplement unit to restart your vehicle in a dead battery situation. However, a wrong selection of amperage in jumper cables may not be able to wake your vehicle battery. So, what should be an ideal amp for your vehicle and the different size of vehicles? What are the other factors that determine the amp capacity of jumper cables? What are the precautions one must take while using jumper cables with different amps? Let’s find the answers to these questions and many more in this post. The amps or amperage capacity of jumper cables depends on various factors. A typical set of jumper cables with a 10-12 gauge wire can handle up to 200amps, while thicker cables with a 4-6-gauge can handle up to 400amps. The higher the gauge the lower will be the amps. Generally speaking, jumper cables having 200-400 amps capacity are sufficient enough for most cars, SUVs, and light trucks. In some cases, you may require to use jumper cables with more than 400amps depending on the power capacity of your vehicle batteries. Some companies claim to offer up to 1000amps which could be exaggerating numbers. Regardless of the amperage capacity, it is also important to choose the proper gauge, and length for jumper cables to avoid any safety risks and prevent sparking or arcing scenarios on battery terminals. The amperage capacity of jumper cables is designed to handle the transmission of maximum current flow between the two batteries. The amp capacity is a crucial factor to avoid overloading the current flow. For example, a dead battery possesses less than 12 volts against a charged battery that has more than 12 volts. The contrasting power difference can lead to sparks and damage to the batteries and electrical components of a vehicle due to a lack of amperage capacity in the cables that are transmitting them. Another example is the difference between the two cars. If the donor car battery capacity is higher than that of the receiving car the jumper cables used should be able to take a load of a bigger battery to transfer the voltage smoothly. If the amp rating is lower or does not match the recommended levels there are chances of the cable getting overheated and damaging the battery components and even generating larger sparks. The amperage capacity is typically indicated by a gauge number. Gauge numbers vary from 1-12 and some may even go up to 16 gauges. A gauge of jumper cable can be determined by its diameter. The lower number of gauges means thicker cables and higher amperage capacity. It is, therefore, necessary to pay attention to the gauge of jumper cables which will by default match or exceed the amperage capacity of your vehicle needs. Gauge is one of the most important factors in determining the amperage capacity of jumper cables. Having said that some of the other factors associated with jumper cables cannot be ignored. When you have decided on the gauge of jumper cables ensure to check the following aspects as well: Length – While considering the length the cables should not be too long. As mentioned earlier, the lengthier the cable, the lower the amperage capacity it will have. Therefore, make sure to have cables long enough to cover the distance between two vehicles. A 10 to 15-foot lengthy cable should be an ideal choice however a 20-foot long will be perfect if it carries an amperage rating of 400 amps or more. Connectors/Clamps – It is crucial to consider the quality of connectors/clamps on the jumper cables. Clamps can be identified as alligator-shaped clips that attach to the battery. Since the clamps are the last point of contact on battery terminals they should be strong enough to hold themselves against the passing electricity. Clamps typically resemble copper material which is a powerful conductor of electricity. If the quality of clamps is mixed with other materials it can cause voltage drop, heat buildup, and arcing which can damage both battery and electrical system of a vehicle. Insulation – Insulation is another important factor that keeps the wires in good shape and condition. Irrespective of the length and thickness, jumper cables are prone to wear and tear courtesy of hard weather conditions and wrong storage. Well-insulated cables can withstand the risks of cold weather and extreme heat. Rubber and PVC material insulation provides quality thickness and durability to jumper cables to protect them from external environmental conditions and accidental contacts. The list of factors doesn’t end here. There is more to choosing a good-quality jumper cable and if you are looking forward to finding out more about them then check here. Small and compact vehicles – For small and compact cars, a jumper cable with an amperage capacity of 300- 400 amps should be sufficient. This is considering the type of engine and battery voltage such cars carry. Along with amperage ensure the gauge of cables is between 4-6 and not less than 10 feet in length. Full-size sedans – A 6-gauge and 20-foot long jumper cable with an amperage capacity of 400 amps should work absolutely fine on medium and full-size sedan cars. SUVs/mini trucks – Looking at the size, battery voltage and engine power of SUVs and mini trucks a 4-gauge jumper cable with a 20-foot length and 600-800 amps can do the job of jump-starting easily. Jumper cables can handle amps according to their gauge size, connector material, and insulation quality. For most cars, a 4-gauge jumper cable with an amperage capacity of 400 amps or more can transmit the current flow smoothly. However, if you have a heavy vehicle consider choosing a 1-2 gauge wire with close to 800 amps capacity jumper cables. The amp rating is

Why do you have to ground jumper cables? Reasons and best places identified
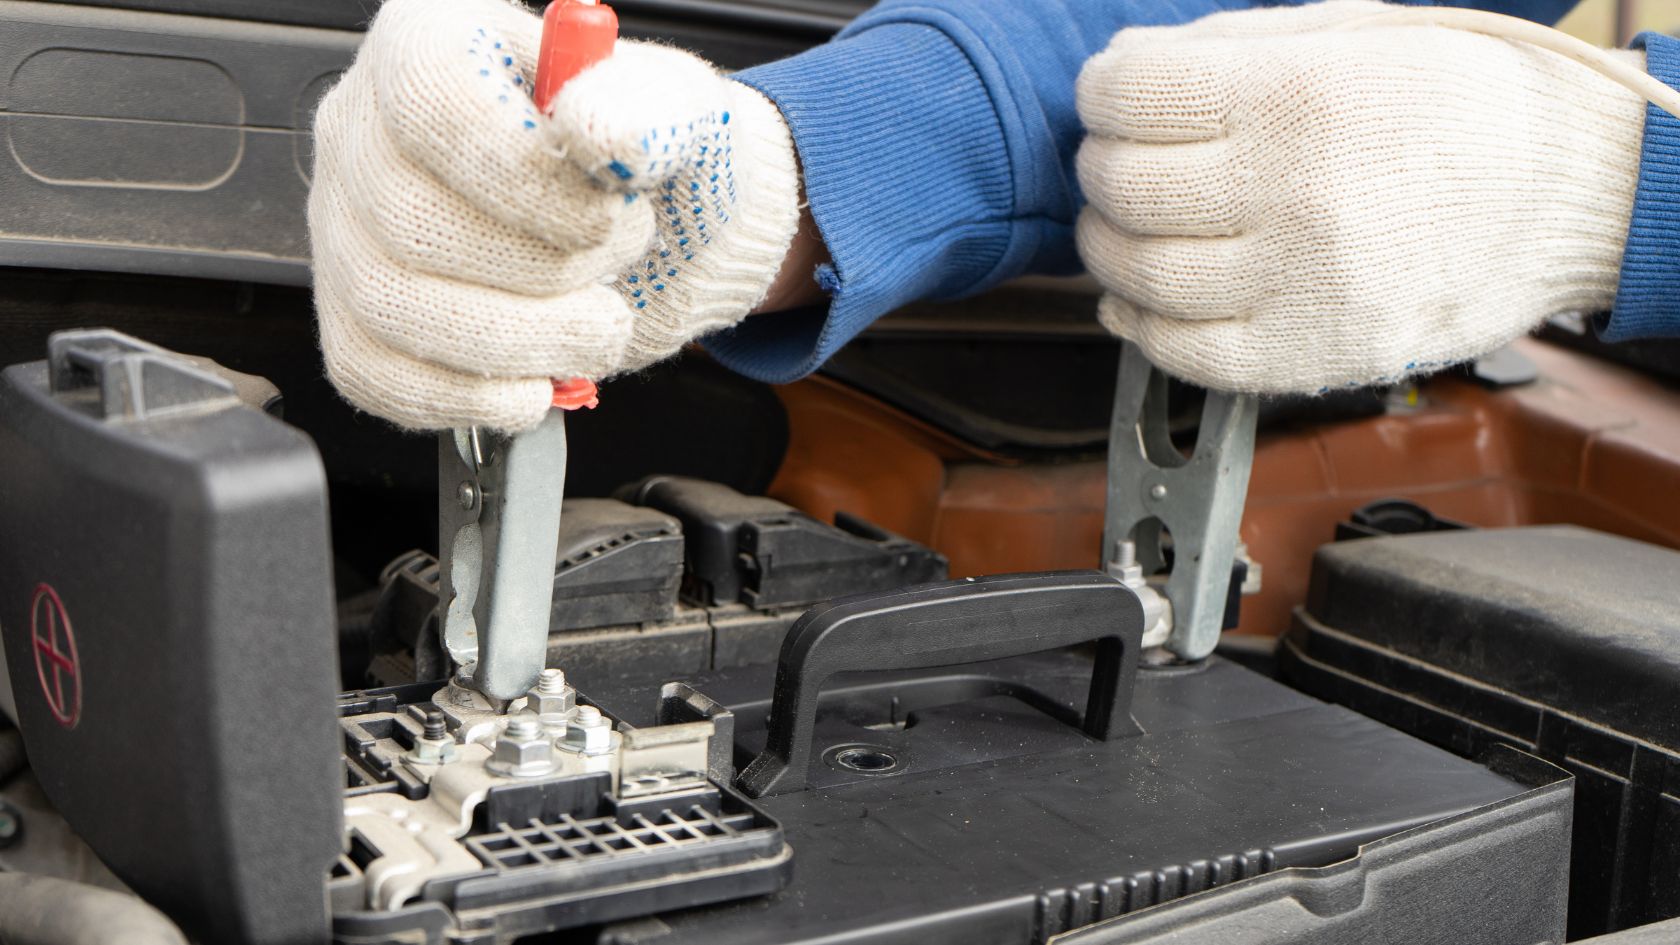
Grounding one side of the jumper cable is a common procedure advised and followed by many motorists. But why do you have to ground jumper cables rather than simply connecting them to the other battery terminal post? The process of jump-starting is an effective way to jolt the car battery. At the same time, the process involves dealing with potentially harmful electrical components that could pose a risk if the cables are wrongly connected. Grounding jumper cables is one of the important steps in following the jump-starting process correctly. The reason behind grounding, the appropriate places to ground the jumper cables, and the importance of grounding the jumper cables are something that we will cover in this post. We will also look at some other aspects of grounding the jumper cables to help you learn the process and stay safe while performing jump starting. The primary reason to ground the jumper cables is to prevent any electrical hazards from occurring during the jump-starting process. Now grounding doesn’t mean the earth ground. Technically, it is the chassis ground that is referred to as jumper cable grounding. Connecting to the metal part, unpainted metal frame or engine block helps dissipate any electrical charge that might build up while the vehicle is being jumped. Grounding of jumper cables is one of the important safety measures that help minimize risks of electrical shocks or damage to the vehicle’s electrical components. The jump-starting process requires two vehicles to create an electrical circuit/flow between the two batteries. To do this, a proper cycle of an electrical circuit is a must to avoid excess voltage. Car batteries have a voltage capacity of 12 volts. The positive terminal possesses +12 volts and the negative terminal has -0 volts. This contrasting difference in volts between the two terminals is the main reason behind connecting the positive jumper cable to the positive post and the negative jumper cable to the negative post. Any reverse/wrong connection could create sparks because of the voltage difference. A car battery is architected with the help of electrolyte solutions in the form of water and sulfuric acid. Under normal circumstances, this electrolysis process buildup hydrogen gases which are released through battery vents. There is a risk of sparks and flames if the hydrogen gas comes in contact with other flammable substances. When two vehicles are connected with jumper cables correctly it passes the balanced current flow to jump the battery. On the contrary, if jumper cables are wrongly connected meaning positive to positive and negative to negative (instead of grounding) it can cause electrical surges and sparks due to excess voltage. Grounding the negative cable to a chassis or any other metal part of a vehicle ensures a smooth flow of electrical current and prevents any electrical shocks/hazards arising due to harmful hydrogen gases around a car battery. So, technically connecting the positive cable to the positive terminal and the negative cable to a chassis ground/metal part rules out any possibility of igniting battery gases avoiding any sparks and explosion. Various electrical hazards/risks occur during jump starting process if cables are not grounded: Electrical shocks – Ungrounded cables can produce electrical shocks while connecting. When the electricity flow passes through the cables it can create electrical shocks by clashing with any of the metal objects. The electrical shocks may not be limited to the metal parts but can impact the car and the individual close to the cables. Sparks or fire – Sparks cannot be avoided if jumper cables are not grounded. The sparks arising due to ungrounded cables can ignite the hydrogen gases around a car battery that can convert into a big fire. Related Read: Jumper cable sparks when connecting Damage to vehicle components – The electrical components of a vehicle is always at risk of getting damaged if the jumper cable is not grounded. Without proper grounding, the power surge can damage sensitive electronic parts such as a radio, computer, etc. It can also impact the performance of other vehicle units including an alternator and the battery itself. There is always confusion in deciding the best place to ground a jumper cable. To help you make decisions faster here is the list of the best places you can use to ground jumper cables: Engine block – The engine block is primarily one of the best places to ground the jumper cable. This is because the engine block has a large surface area that makes it easy to attach the jumper cables. More importantly, it provides a direct connection to the negative terminal of the battery. The large and sturdy metal surface is a perfect place for the cable clamp to make a good connection. It is also considered an ultimate grounding point for the vehicle’s electrical system. Look for a clean and unpainted surface for grounding the jumper cable on the engine block. Chassis – The whole chassis is typically considered an extension of the negative terminal. This makes it the second best place to ground the jumper cable as the risk of electrical hazards and shocks with the chassis is the bare minimum. The chassis is also instrumental in providing the direct return path to the working battery which results in better current flow and a lower drop in voltage. Make sure to choose a place on the chassis that is without paint and dirt for better connection and current flow. Grounding lugs or terminals – Grounding lugs are usually located near the battery and can be directly connected to the vehicle’s frame. Grounding lugs or terminals are made of strong quality metal that can withstand the high current flow that passes through jumper cables. The location and design of grounding lugs reduce the risk of damage to the electrical system and injury/shocks to the person performing this task. Alternator bracket – Another place in contention for grounding the jumper cable is an alternator bracket. Since the alternator bracket provides a direct connection with the engine block it becomes easier
What does it mean when jumper cables catch fire?
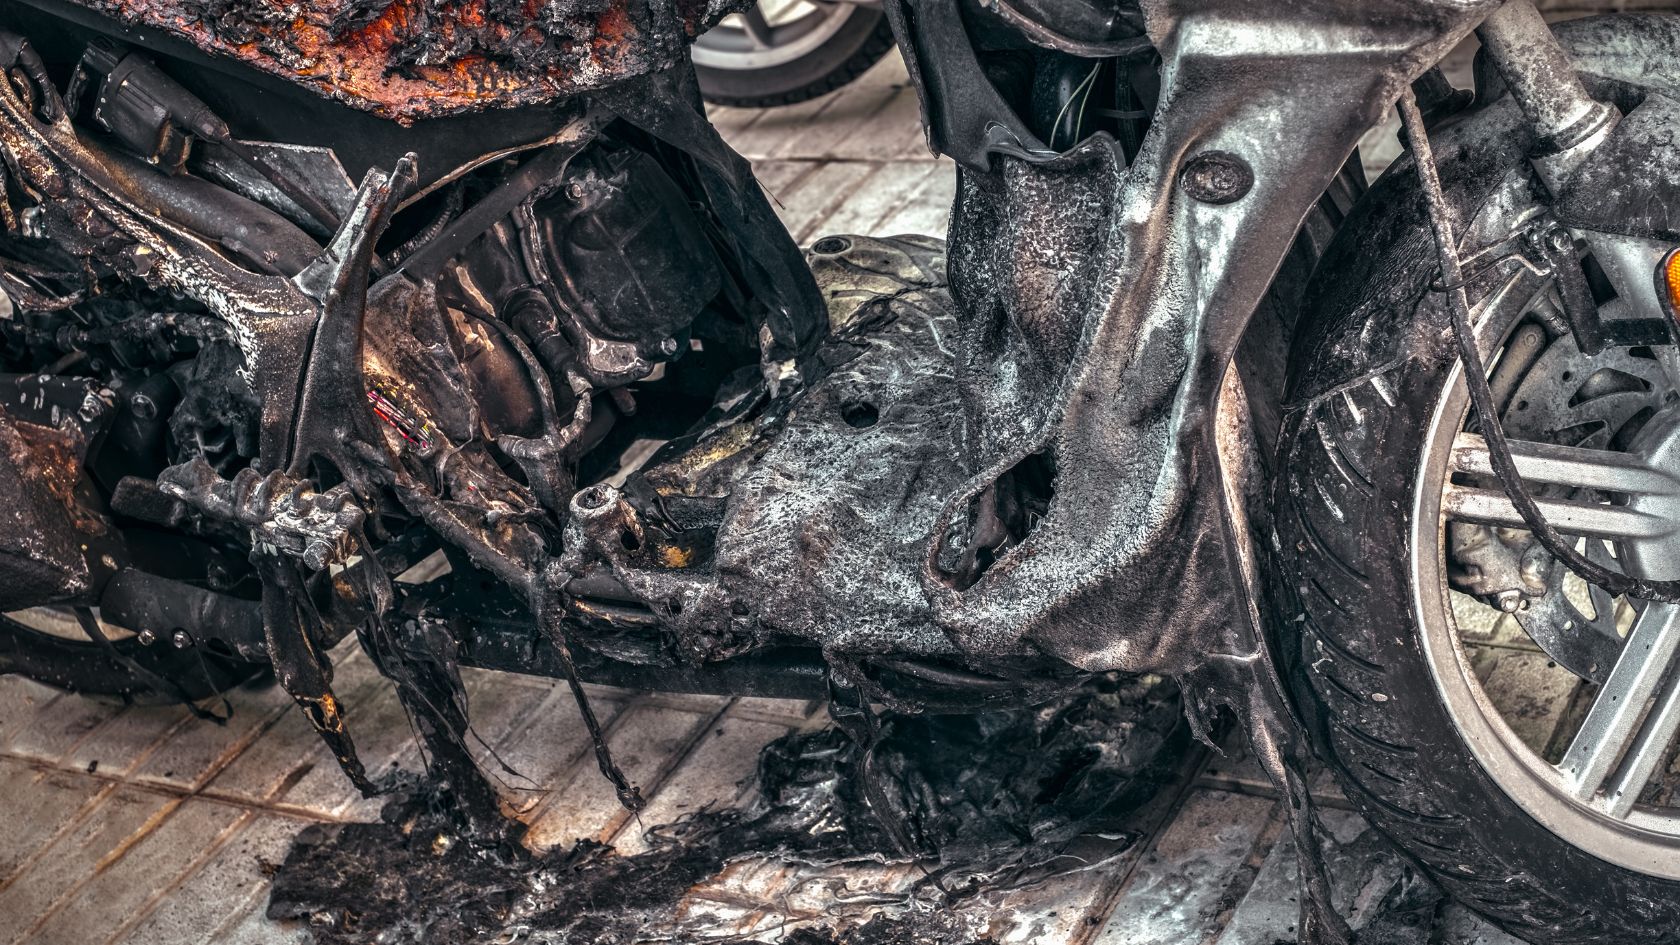
So, what does it mean when jumper cables catch fire? Have you been at the receiving end lately? Is the cable, battery, or both responsible for the firing mess? Jumper cable catching fire isn’t a rare scenario. In fact, it is pretty common to see mild sparks whenever you try to jump-start a vehicle. The intensity of sparks increases with various factors that can lead jumper cables to get hot, melt, and even catch fire in some cases. Causes of jumper cables fire and their preventions are what you will find in this post so, keep reading! Jumper cable fire is often related to the condition of the battery you are trying to jump-start. A battery that is severely damaged, or corroded releases flammable and explosive elements that can lead to a jumper cable fire. Some of the other reasons attributed to jumper cable fire are wrong connections, overloading, unbalanced battery combinations, and inferior quality of wires. Jumper cable catching fire does not necessarily mean the whole vehicle catching fire but, yes it can lead to serious consequences on other related parts dependent on the battery. Notwithstanding the fact and importance of jumper cables, it becomes vital to understand the circumstances of jump-starting a vehicle especially if you are new to the process. A battery that is extensively damaged in the sense already completed its lifespan or aggressively used without maintenance itself is a risky object from jump-starting perspective. The elements contained by car batteries have the potential to ignite fire as soon as it comes in contact with another electrical conductor. In this case, the jumper cables cause immediate sparks when connected to a weak battery. Sulfuric acid is a steamy vapor released by car batteries through vents that converts into flames due to jumper cable connection sparks. It is therefore important to keep the battery well-maintained. Car batteries take charging power from an alternator to keep all the electrical components of a car active. This does not mean getting complacent and always leaving the accessories and other parts ‘on’ when turning off the engine. Such an act is a major cause of concern for premature exhaustion of car batteries. In the absence of proper maintenance, the condition of such batteries worsen and does not favor recharging. An attempt to jump-start your vehicle under these circumstances could be risky and may further damage the battery and its associated components as well. A replacement could be a better option so, instead of attempting a jump-start process it is better to get your car battery inspected by professionals and follow their advice. Corrosion on battery terminals is dangerous not only for the battery itself but also for the jumper cables. There is no denying the fact that corroded battery terminals could potentially cause jumper cables to catch fire. This is because long-term corrosion or thick dirt could interrupt the current flow between the battery and cable wires. When the passing of current is impeded it could lead to dangerous sparks damaging the battery and other parts of the vehicle. Hence, proper cleaning of battery terminals is necessary before applying jumper cable connections. Jumper cables come in various sizes and power-resistant capabilities and as against the myth, all of them are not the same. Overloading of a jumper cable scenario is possible and evident if you use bare jumper cables with lower gauge/amps on a larger battery. Vehicle owners who hardly faced bad battery situations may unknowingly create an overloading scenario. A small-size hatchback and a big SUV may not have the same voltage batteries. So, if a 12 volts battery is connected with a 24 volts battery (as an example) that too on a set of weaker jumper cables it can create a fiery situation. A short circuit is bound to happen that can damage the overall structure of jumper cables. This can result in overheating, melting and finally smoking of jumper cables. It is always important to know the process of jump-starting not only in terms of steps but also the capacity of batteries and jumper cable charging limitations. Inferior quality jumper cables are always risky and vulnerable to catching fire quickly. Solid copper metal should be part of every jumper cable to conduct electricity efficiently. Another factor is the thickness of wires which are also called gauge. An average of 4-6 gauges should be conducive to handling the transferring voltage pressure. Jumper cables should also be powerful insulators. The insulation capacity should match the thickness of wires as well as clamps/handles that ensure flexibility, durability, and functionality. When jumper cables fall short on any of the above qualities, the chances of sparks and fire increase significantly. This is due to their inability to take the load and handle amps while transmitting the power between two batteries. It is imperative to research and take proper guidance before purchasing a final product. Cheaply valued cables can lead to long-term expenses on battery replacement and vehicle repairs. Secondly, inferiority is not limited to a new set of cables. Storage and maintenance are two other factors that contribute to the weakening and damage of all types of jumper cables (old or new). Related Read: Are jumper cables for car batteries waterproof? With time and usage jumper cables are prone to damage. Depending on the storage location and weather conditions, the metal portion of cables could catch rusting and corrosion. The clamps and insulators are vulnerable to wear and tear and could break if not taken care of. If you find your jumper cables in helpless conditions it is better to replace them with new ones rather than using them for jump-starting which could be unsafe and hazardous. One of the common mistakes every type of car owner makes is the improper connection of jumper cables. Regardless of the knowledge and experience, there are instances of cables and cars catching fire due to negligent positioning and connection of wires. It is a simple human error that leads to dangerous consequences so in case

Is it safe to charge a motorcycle battery indoors?
A motorcycle standing idle for an extended period of time may leave its battery powerless. Often, motorcyclists opt to perform the charging process indoors to save themselves and their bikes from inclement weather. But is it safe to charge a motorcycle battery indoors? What are the risks associated with indoor charging and what is the correct method to charge a motorcycle battery indoors? You will find answers to these questions in this post. There is more information regarding motorcycle battery charging so continue reading till the end. Yes, it is safe to charge a motorcycle battery indoors provided you follow the proper processes and take the necessary precautions to avoid risks associated with indoor charging. It also depends on the method you follow for charging. Some motorcyclists remove the battery and keep it on charge and some connect the charger to the battery on the motorcycle itself. Either way, you have to take certain considerations into account before commencing the charging process. Some of the factors that need attention while charging are the type of charger you use, the condition of the battery, the ventilation options, and the outside temperature. To make the indoor charging process risk-free it is important to know the… Harmful gases – The release of hydrogen gases are quite common while charging motorcycle batteries. An automotive battery is designed to generate hydrogen and oxygen gases as part of an evaporation process due to sulfuric acid and water chemical reactions. There is a risk of inhaling these harmful gases in an enclosed space while charging. Since the charging process takes longer the effects of harmful gases could be dangerous to your health. It is best to charge the battery in a well-ventilated area especially a garage with a door/window open. This will ensure the gases are evaporated further through the ventilation space making your charging effort risk-free. The risk of harmful gases is negligible if your motorcycle is equipped with sealed gel or maintenance-free batteries. Fire risk – Harmful gases around a motorcycle battery are highly flammable. The risk of fire is inevitable when these gases come in contact with other ignitable sources such as a cigarette spark. If you are using an indoor space close to the kitchen for charging the risk of fire increases tremendously. On top of that, if you use a low-quality battery charger on a fully drained or dead battery it can create sparks that could lead to a potentially dangerous situation while charging indoors. Overcharging – A low-quality battery charger also means that you have to monitor the charging process till the battery is fully charged. There are no alerts, indications, or alarms that will automatically save your battery from overcharging. In the overcharging scenario, a motorcycle battery is overheated. The excess heat and sulfuric acid gases of a battery become sparking sources that could result in fire and explosion. After taking the risks into consideration if you still want to charge a motorcycle battery indoors then here are the precautions you must take before doing it: Ensure proper ventilation – Choose a place that is well-ventilated. Leave the windows or spaces open for proper ventilation. The buildup of gases and heat produced while charging will evaporate equally through ventilation sources reducing the risk of fire. Keep a fire extinguisher – The risk of fire is reduced with proper ventilation but not completely eliminated. Therefore it makes sense to keep a fire-fighting unit such as a fire extinguisher ready. Related Read: Best Motorcycle Fire Extinguisher In the event of any fire, a fire extinguisher will come in handy to protect your indoor place. Alternatively, remember the emergency numbers for dialing if you are not familiar with using a fire extinguisher. Use protective gear – Wear protective gear such as eyewear, hand gloves, and overall protective clothes while charging. An automotive battery contains highly flammable gases which may spill accidentally or negligently making you vulnerable to injuries, burns, etc. Ensure suitable weather conditions – If you are charging the battery indoors it is important to ensure proper ventilation. The weather outside should be suitable to allow ventilation as too much heat outside is not good for the health of your motorcycle battery. Hot temperatures increase the evaporation process of sulfuric acid and any attempt to charge the battery in such conditions brings sparks and fire into the picture. On the other hand, if the weather is too cold you may have to perform charging under closed doors which again is risky and dangerous due to lack of ventilation. Use dedicated charging units – Make use of the dedicated battery charges such as smart charges with advanced features. Battery charges that are specifically designed for charging will help reduce the risk of overcharging. Some chargers have an automated shut-off feature once the battery is fully charged so that you don’t have to monitor the charging manually. You can also find desulphurating chargers made to charge batteries that are completely dead. Then there are trickle chargers useful and risk-free to charge batteries in idle conditions. Make sure you know the process – Lastly, it all comes down to your knowledge and experience in charging automotive batteries. Some of the things you should be aware of while charging is: If you don’t know the process it is better to seek professional guidance before deciding on a place to charge the battery. Once you have taken all the precautions to avoid the risks of charging a motorcycle battery indoors here are the steps to perform the charging process: Here is a small video to help you understand the process of charging a motorcycle battery indoors using a trickle charger: You can charge a motorcycle battery in a connected position but it is not recommended. A motorcycle battery provides power to all the electrical components taking its own current from the alternator. Since it is interconnected with the motorcycle’s electrical system any sparks, or electrical hazards generated during the charge can damage all the associated
Can motorcycle batteries explode? 5 primary causes and solutions revealed
Motorcycle batteries are relatively smaller than car batteries but possess almost the same voltage power and functionality. A car battery explosion is quite common for various reasons. However, can a motorcycle battery explode for the same reasons as a car battery? Motorcycle batteries inherit the same substances and fluids used in an automotive battery which is shared across all types of vehicles. What makes them more dangerous is the position they are installed on a motorcycle which leaves very little scope for escape and survival in case they explode. It is therefore important to know the facts about motorcycle battery explosions, their causes, and preventions to make your ride safer and risk-free. Yes, motorcycle batteries can explode under certain conditions and reasons inclusive of human error and technical mal-functionalities. One of the main causes of motorcycle batteries exploding is overcharging. Some of the other reasons include the environmental conditions the batteries are used in and the ways they are handled and maintained. Low-quality charging instruments and accidents/clashes can also contribute to the causes of motorcycle battery explosions. Learning more about these causes will help you identify the problem early and take action proactively. Automotive batteries are prone to discharge with usage. The process to recharge the battery includes using a battery charger or jumper cables. Many motorists accidentally leave the battery on charging for too long which creates a risk of explosion. The electrolyte process in a battery which works on a combination of sulfuric acid and water releases vaporized particles in the air in the form of hydrogen gases. When the battery is overcharged it disturbs the electrolyte process breaking the water elements that increase the level of hydrogen gases. Overcharging also causes a battery structure to overheat which then begins to ignite sparks with the help of surrounding hydrogen gases. This is also called a thermal runaway process that is invoked while creating too much heat during charging. The overheating scenario is not limited to overcharging. A faulty electrical system of a motorcycle that is not functioning properly can generate too much heat while charging. The excessive build-up of heat and hydrogen gases leads to a potentially dangerous situation of battery explosion. To prevent a battery explosion due to overcharging proper scheduling and monitoring are necessary. On many occasions, motorcyclists tend to leave the battery charging for a long time. This should not be the case. It is better to plan the charging process well in advance. Ensure to take proper precautions of the surroundings where you are planning to charge. Secondly, keep the flammable items away from the motorcycle while charging. Lastly, ensure to monitor the proceedings of charging at regular intervals. Above all make sure the charger you are using is of good quality. Low-grade battery chargers heat up early and may explode before completing the charge also damaging the motorcycle battery. Very high temperatures are responsible for the premature degrading of motorcycle battery substances. When the Fahrenheit is too much to handle, the electrolyte process is unbalanced. The water is reduced and the concentration of sulfuric acid buildup is wide and thick. This leads to much faster evaporation of flammable gases in the air making the battery vulnerable to catching fire and eventually exploding. Similarly, cold temperatures have adverse effects on battery substances making them freeze quickly. The frozen liquid doesn’t allow the battery’s chemical reaction to function properly making the battery unusable. More often than not, motorcyclists find it difficult to start the engine in cold temperatures. This attempt of starting a motorcycle in freezing cold many times create sparks owing to chemical reaction and hydrogen gases. In some cases, sparks could blow up the battery with continuous efforts of starting the bike. To avoid battery explosions in challenging weather conditions it is crucial to protect the motorcycle by parking it under the shelter or garage. Secondly, keep a tab on the battery condition in hot weather. Make sure to test the voltage power regularly and charge it as soon as you find a drop in voltage. In cold temperatures, try to keep the motorcycle warmer by running the engine for a while. If the charging is down recharge the battery connecting to a charger and ensure the battery is good enough to hold the charge. If you are planning to take a trip in the cold or hot weather protect yourself with proper clothing and carry the necessary charging units with you to counter any motorcycle battery issues. Jump-starting a motorcycle is quite evident when you travel in testing environmental conditions which makes a battery loses its charge quickly. Jump-starting a bike is very effective in boosting the motorcycle if done correctly. However, improper cable connections, faulty jumper cables, unsuitable charging conditions, and non-compatible donor vehicles could pose a risk of fire and explosion. Whenever you face a jumpstarting situation ensure to keep the following points in mind: A short circuit is another cause of concern that arises frequently in hot or cold weather conditions. Any shorts appearing due to overheating in the electrical system could enhance the current flow leaving the battery charge-less. When the battery is low on charge it gets heated up quickly with continuous usage. The sparks and explosion could be the end result of short circuits and overheating of motorcycle batteries. It is sensible to avoid using a motorcycle in unsuitable weather conditions. However, if the need arises ensure to take short intervals while traveling to keep the motorcycle battery and other parts under control. When a motorcycle is severely clashed with another vehicle or falls on the road the damage could be beyond imagination. One particular victim of motorcycle accidents is batteries. Clashes and accidents make the motorcycle parts vulnerable to catching fire and when a motorcycle battery comes in contact with such fire it can potentially explode. While you can’t do much in such a situation like this except save yourself first it is always better to keep the battery well-maintained and protected in a

What happens if you put a motorcycle battery backward (position)?
Do you have a nick of playing with your motorcycle battery? If yes, I am sure you must have faced instances of misplacing or wrong positioning of the battery. So, what happens if you put a motorcycle battery in a backward position? This is the main topic we will cover in this post. Additionally, you will also learn about the steps to take after performing this silly act and what is the correct way to place the battery on a motorcycle if you want to continue doing it yourself. We will also answer some of the common questions related to motorcycle batteries so continue reading! If you put a motorcycle battery in a backward position it could potentially damage the battery and cause many other issues to your bike’s electrical system. Some of the causes include sparks, short circuits to the main fuse (s), and a significant impact on the engine control unit. If you don’t know how to position and install a battery on a motorcycle it is better to take help from a two-wheeler mechanic. However, if you have done this act accidentally or purposely then be ready to witness…. There will be clear sparks when the battery is positioned incorrectly. In the backward position, the battery terminals are completely reversed making it vulnerable to sparks and explosions. The reverse order of the positive and negative terminals can create a short circuit leading to sparks. These sparks can turn into a potential fire if the metal frame and other nearby parts of the motorcycle come in contact with each other. Damage to the electrical components such as the ignition system, charging system, and other electronics relying on the battery is inevitable. This is due to the reverse order of battery terminals that also reverses the current flow resulting in damage to the entire electrical system. The main fuse of the battery is the first victim of reverse polarity. The fuse is mainly located near the battery terminals which gets burned if the battery is installed in a backward position. Your motorcycle won’t start with the fuse damaged due to the short circuit created by the reversed position of the battery. In all likelihood, the engine control unit/module of a motorcycle may also get impacted due to the backward connection of the battery. The electrical issues and short circuits are capable of damaging the whole ECU which means malfunctioning or failure of many components such as capacitors, resistors, fuel injectors, ignition timing, etc. Lastly, the battery itself may not survive its structure if it is connected in reverse polarity. The internal components of a battery may get overheated releasing toxic fumes which can be dangerous to handle. In some cases, the battery may even explode. If you realize the incorrect position of your motorcycle battery it is essential to take some steps immediately to avoid the above-mentioned damages. Removal of battery – Disconnect the battery and remove it to check the signs of any damages or mal-functionality. When you do this ensure to take proper precautions like wearing gloves, etc. to protect yourself from electrical hazards. Inspect the battery – Check the battery all around to find the signs of any damage. Look for melting, deformation, or leakage points. If there are any abnormalities found do not attempt to connect it again. Check the fuses – Wrong connection definitely affects the fuses of a battery. Inspect the condition of fuses to see if they are blown or still working. If the fuses are blown it is necessary to use a spare one or replace them before connecting the battery. Reconnect the battery – If the battery is found to be in normal condition you can re-attempt to install the battery with the correct polarities. Make sure to double-check the position of terminals and the connection of wires. Test the electrical components – Start the motorcycle to test the electrical system and everything else is functioning properly. Ensure the starting sound is normal, and check the headlights, signals, and other electrical components are working correctly. Seek professional help – If you are not sure of the process to disconnect and re-install the battery it’s best to seek professional help. If you have re-installed the battery yourself it is still recommended to get the connection confirmed by a motorcycle professional to ensure the battery and motorcycle are safe to ride again. If you are looking to install a motorcycle battery yourself but don’t know the correct way to do it here are the basic steps to follow: Here is a small video to help you understand the process of installing a motorcycle battery correctly – Using jumper cables on a reversed position motorcycle battery can create a short circuit leading to larger sparks. Related Read: Jumper cable sparks when connecting The preceding damage from the sparks could lead to the malfunctioning of the battery, electrical system, and many other associated parts depending on the electrical flow. In some cases, the sparks can turn into potential fire frying up the whole motorcycle. Fixing a battery that has reversed polarity is possible but not recommended. Doing this could further damage the battery components and may lead to dangerous consequences for the person doing it. Still, depending on the severity of damage and duration passed in reversed position a battery can be tried for fixation. Here are some steps you can attempt to fix a reversed polarity battery: A motorcycle battery installed in a backward position is always dangerous and risky from a riding perspective. Such position of batteries reverses the flow of current damaging the battery itself and many other parts of a motorcycle. The effects of reversed polarity can corrupt the whole electrical system of a motorcycle making it useless to ride. If you are not sure about installing or replacing a battery on a motorcycle it is better to get it done under professional guidance. If you have installed the battery in reversed order accidentally then follow the information and